As a Christmas gift to myself, I decided to get a new keyboard; a keyboard that I had scoffed at using not too long ago because “lol where’s all the keys?“. That keyboard is the Planck EZ Glow. This post is to describe how I have it setup, not to give a whole backstory as to why I decided to get it (that’s for me and my journal to know, thank you very much). I affectionately refer to my keyboard as the macinplanck.
Outline
Open Outline
Caveats
Some front-matter before I get into things:
- I’ve been getting more and more into Vim, which is what inspired me to set up the keyboard the way that I did.
- I use a Mac, so there are a bunch of mappings that I describe later that are only relevant for that OS. If you decide to duplicate this mapping, keep that in mind.
- Currently, I’ve configured everything through the Oryx configurator online; I know that more advanced macros and such exist in QMK, and that there are some things that I describe below that could be more efficiently accomplished via editing the
keymap.cdirectly, I just didn’t have the time (nor the patience) to get into that this time around.
Links and Resources
Here are links to my current configuration:
- Planck EZ Configurator (my current, full setup)
- Relevant
.bin, source, and PDF files for my current layout.
…and here are resources that I used to configure my setup:
- QMK Documentation (which is fantastic, btw) - a lot of acronyms below are coming straight out of this documentation, so it’d probably be handy to have this open as you read along.
- vimhelp.org (if you don’t know Vim, one thing that you should know is that this is essentially your bible)
- r/olkb (solved pretty much any issue I encountered in this keymap build by searching here)
- Wally (and it’s
wally-clicounterpart) for easily flashing new firmware.
If history is any indication, the configuration that I’m about to describe will probably be out of date by this time tomorrow, but I feel that writing down my thought process helps me pick out the holes in my logic and give me ideas for future improvements.
But anyway, who cares? Onto those sweet, juicy layers to make sense of wtf I even did.
Layers
I currently have 9 layers (Lower, Base, Raise, Adjust, NORMAL, VISUAL, NRMLSHFT, WINDOWZ, and LGUI_ALL):

Not the biggest of drawbacks, but for whatever reason you cannot edit or delete the names in the first four layers. Removing the ability to delete them is understandable (otherwise it’s kinda not a Planck), but the inability to rename them didn’t really make sense to me. Oh well!
I’ll be going through the Base layer first, just because that makes sense in my head, and move through all of the other layers sequentially.
The Base Layer
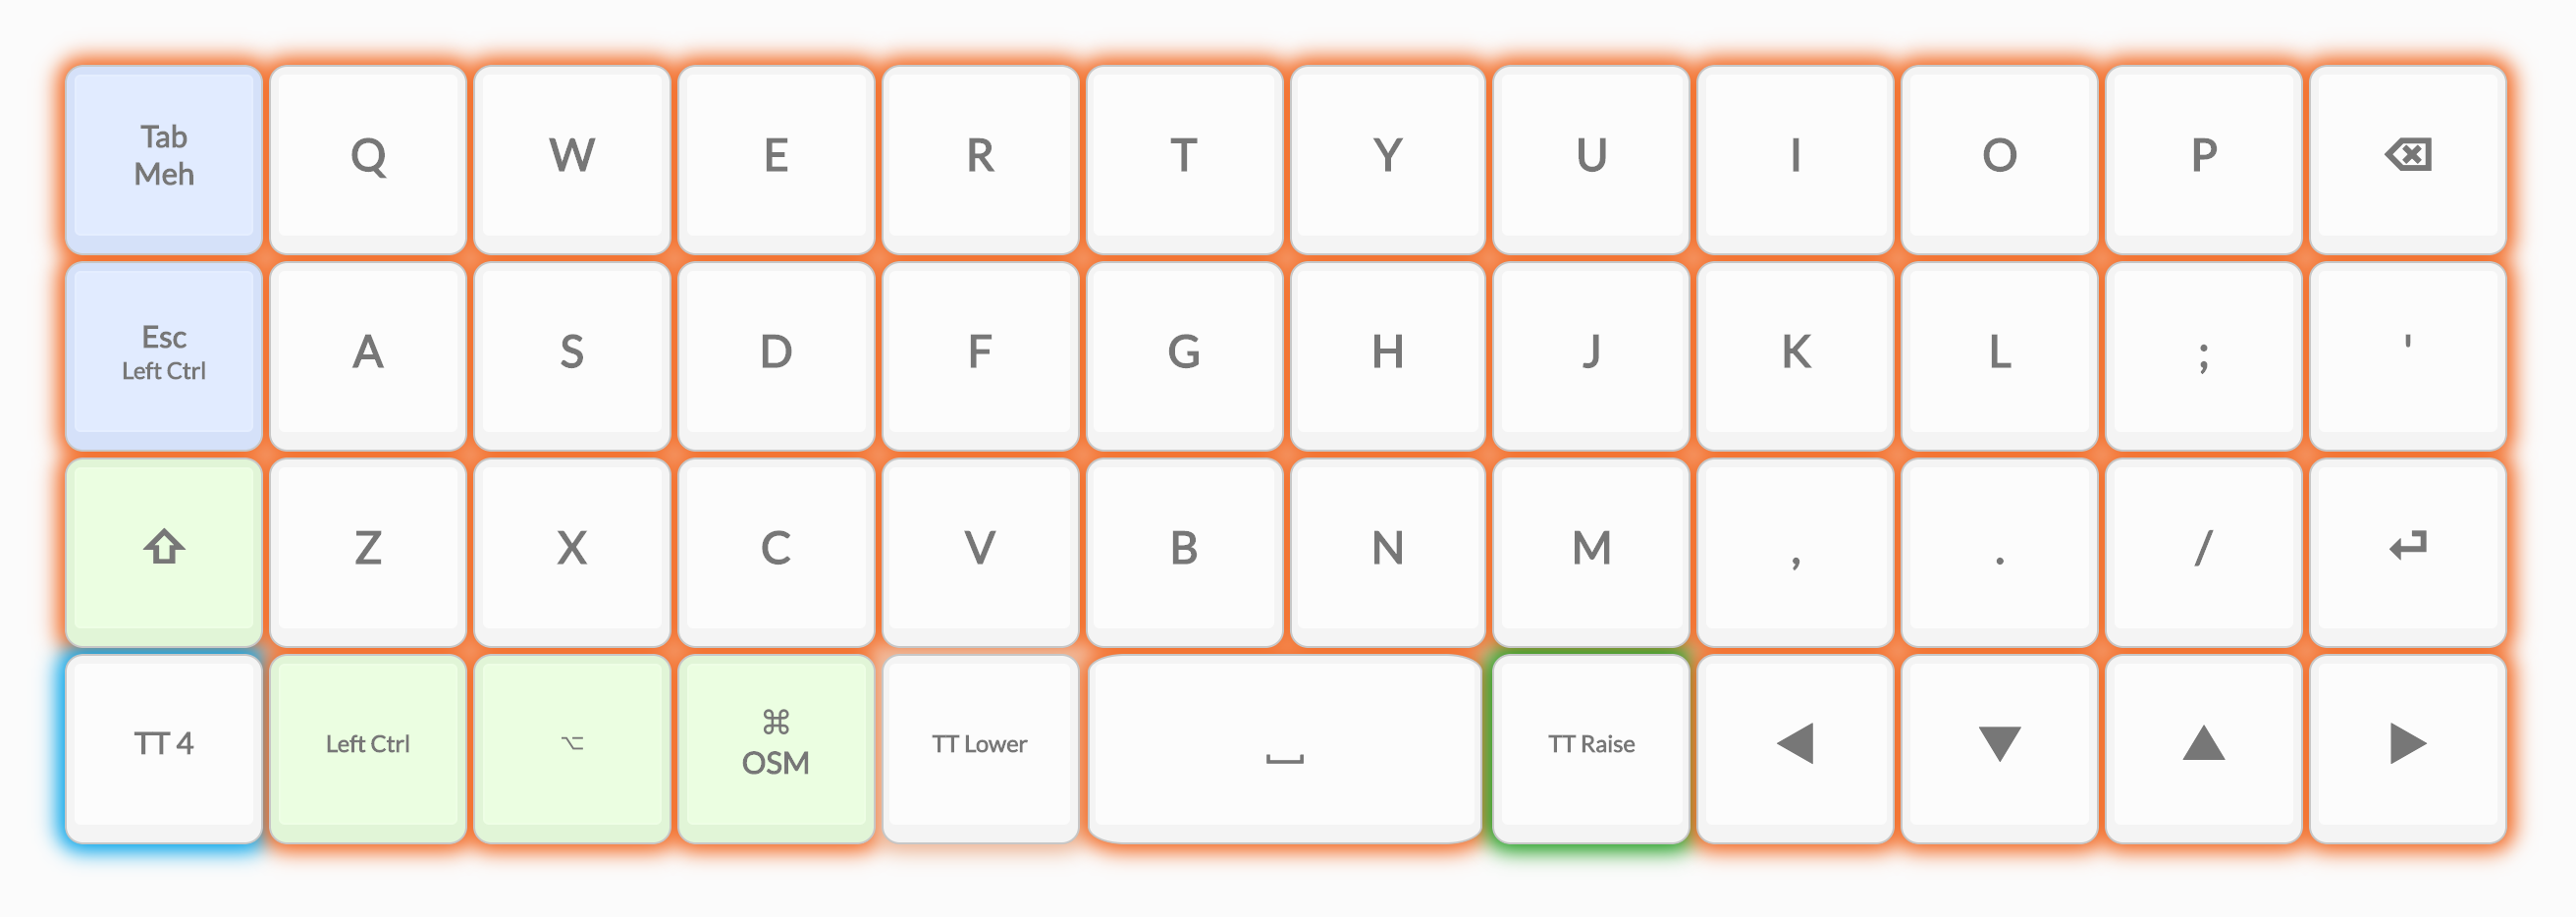
A lot of this layer is the same as the default config. QWERTY layout, Lower/Raise are in the same spot, etc. There are some distinguishing characteristics, though:
Hyperis replaced withTT(4), which brings you to theNORMALlayer.Escis mapped to the equivalent ofLCTRL(KC_ESC), which means:- Tap ->
Esc - Hold -> Left Control (modifier)
- This is how it should be on every keyboard, don’t @ me.
- Tap ->
Tabis mapped to the equivalent ofMEH_T(KC_TAB), which means:- Tap ->
Tab - Hold -> Meh (Left control, Shift, and Alt modifiers)
- This is done this way because I have many macros defined via Keyboard Maestro that launch applications by performing
Meh+<some-character>(like this).
- Tap ->
- The
LowerandRaisekeys have been changed toTT(LOWER)andTT(RAISE), respectively, instead of the regularMO()functions they are mapped to. This was done for a couple of reasons:- Sometimes I like to stop and think about what numbers/symbols I’m going to use, and sometimes I know exactly what I want to do and then move on with typing.
TT()suited this better; if you tap the key it’ll bring you to the associated layer and then stay there, but if you hold the key, you’ll only activate the layer for as long as you hold it (which is the default behavior of theLowerandRaisekeys). This is the same reason why I useTT(4)above. - Because I have modifiers in these layers (more on this below), keyboard shortcuts felt “clunky” to use when I switched to
Lower/Raisein the default config, since you had to do essentially a dance, pressing multiple keys to get what you wanted. Changing this to that tapping the key brought you into the layer and then left you there allows me to compose shortcuts a little more fluidly.
- Sometimes I like to stop and think about what numbers/symbols I’m going to use, and sometimes I know exactly what I want to do and then move on with typing.
cmdis slightly modified to beOSM(MOD_LGUI), which is just fancy for “if I tap this key, the modifier is ‘active’ until I hit another key (or just wait)“. This is mostly useful for the chords I have mapped in VSCode (my editor of choice).
And that concludes our Base layer tour. Onwards!
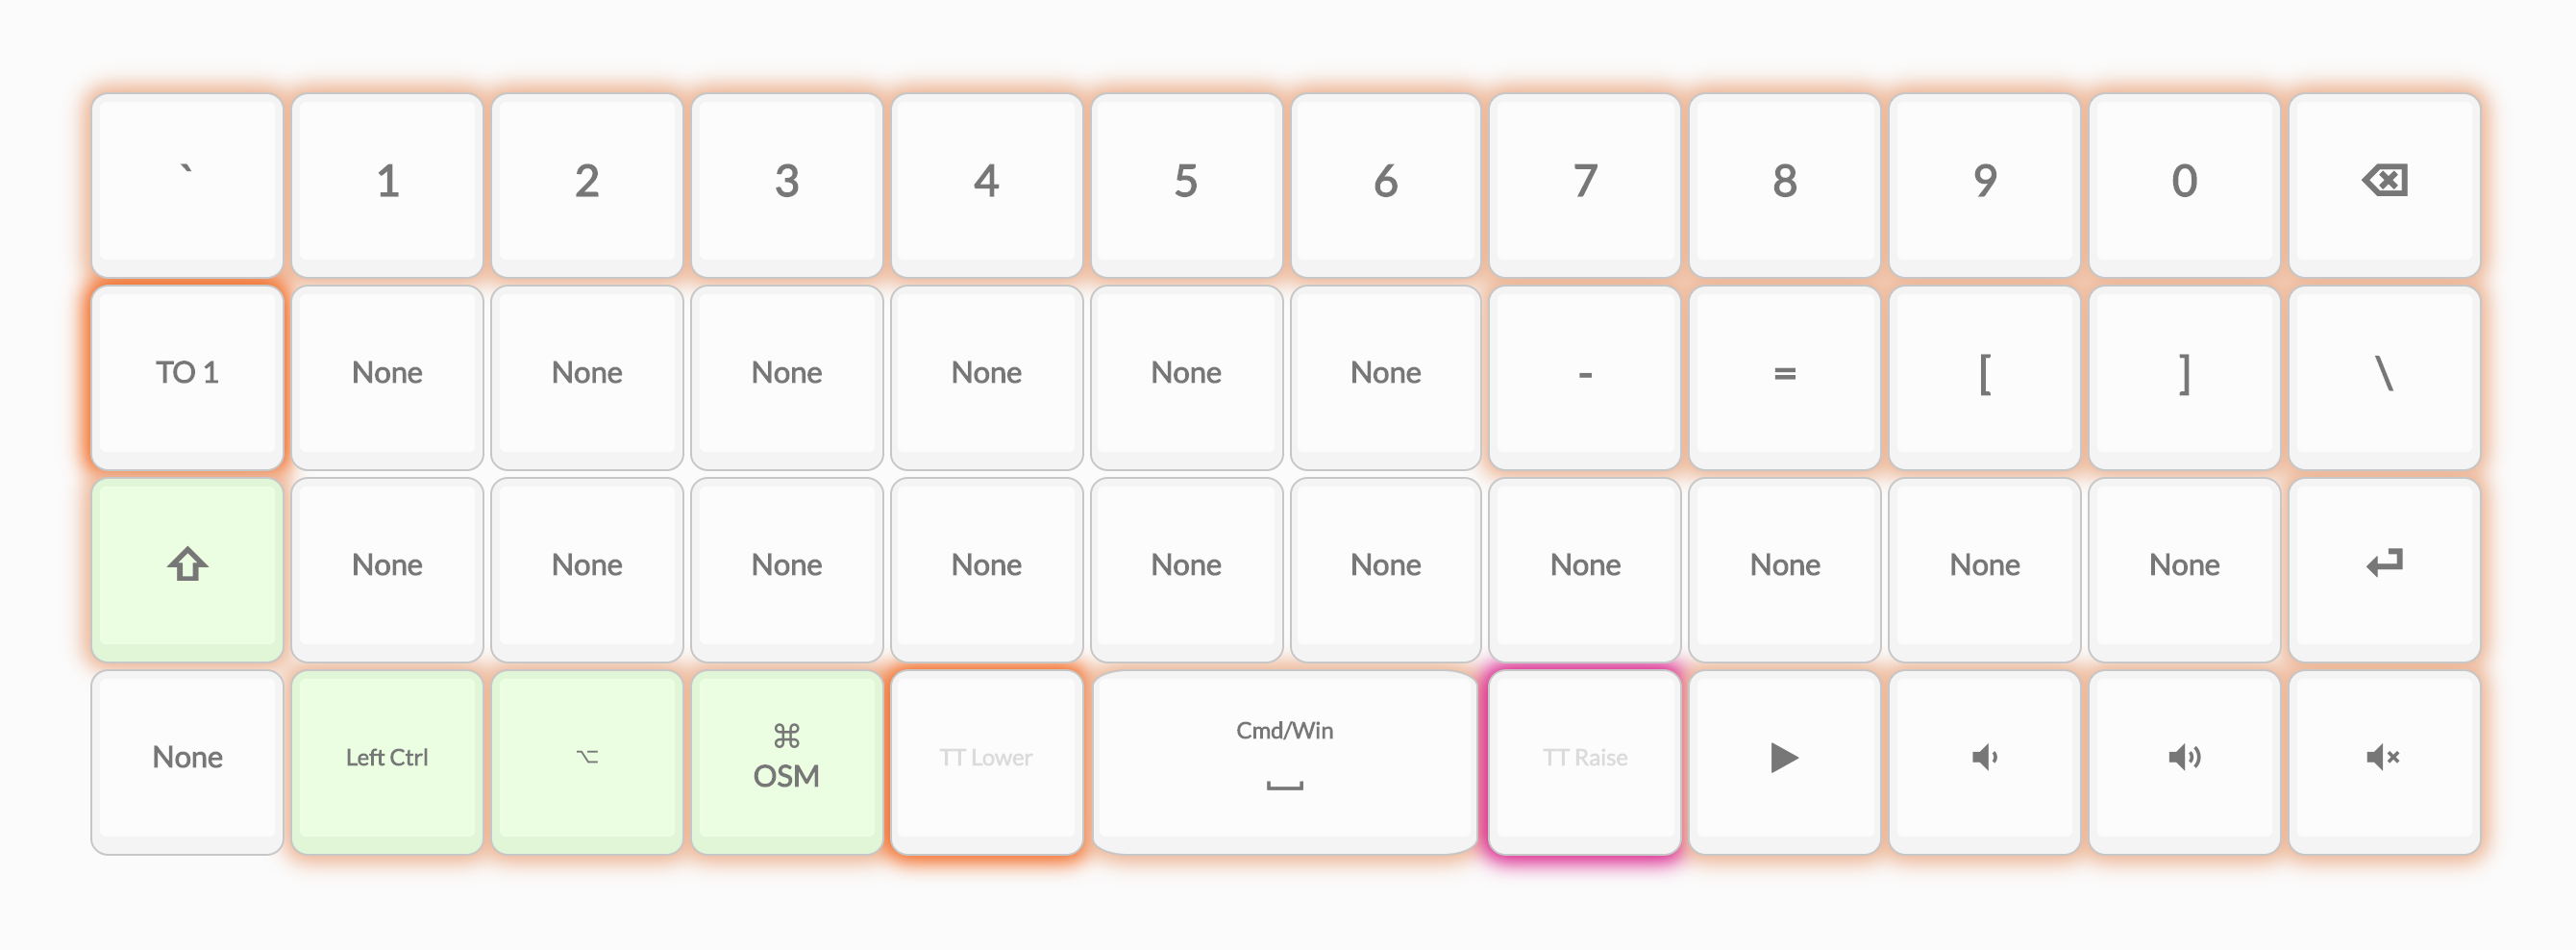
The Lower and Raise Layers
Lower:
Raise:
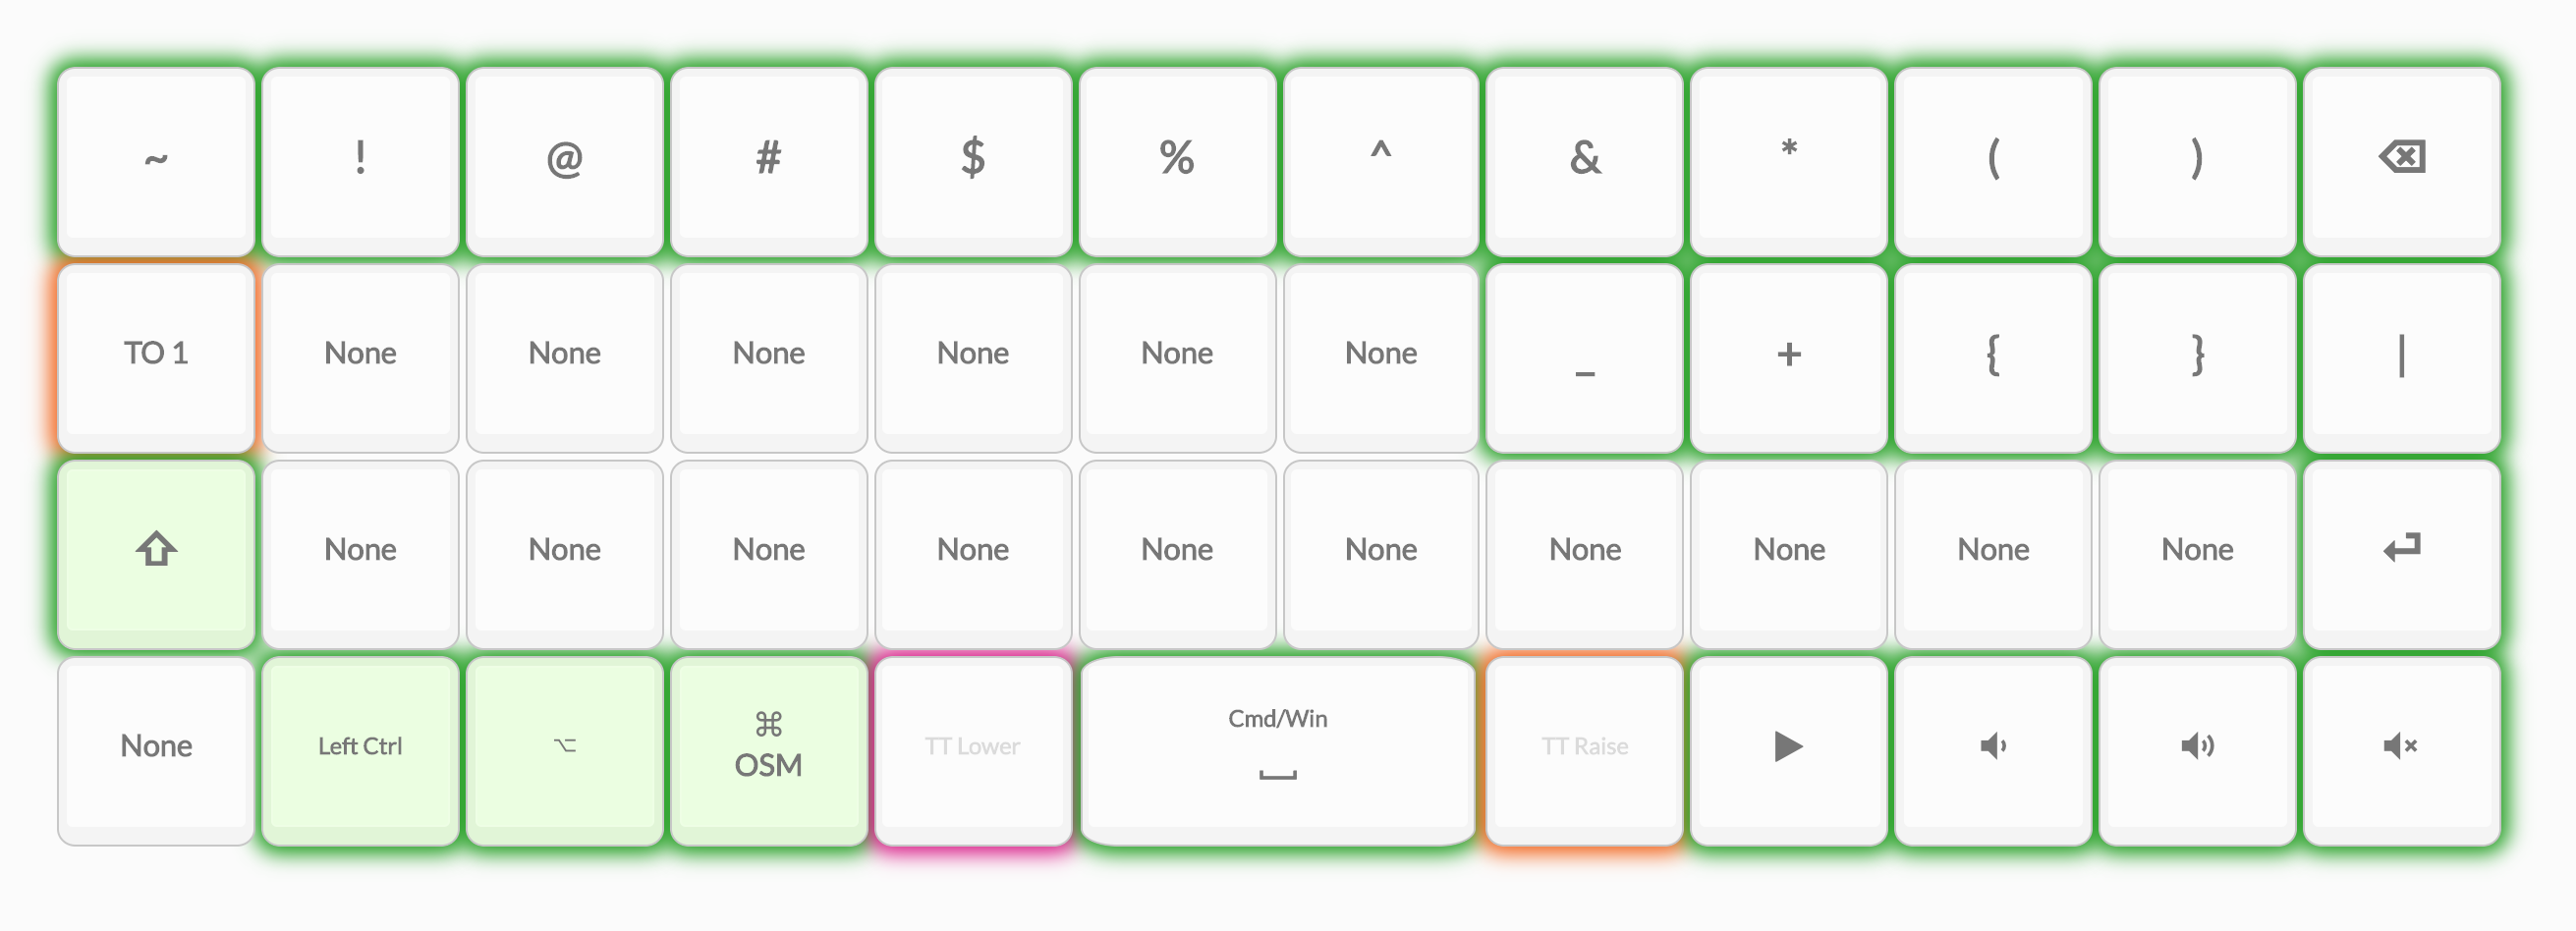
It helps to explain these both at the same time because there are a lot of similarities between the two, but with one key difference between the base config; the layers have essentially been swapped. When you look at a “traditional” keyboard, the number keys above the alphabetical characters have the number printed underneath the symbols, so in my mind they are “lower” than the symbols. As such, the Lower layer maps to numbers (and other keys that you get without pressing “Shift” on a traditional keyboard) while the Raise layer maps to the symbols (and other keys that you get when pressing “shift” on a traditional keyboard). The Planck layout made more sense in my brain when I did that; your mileage may vary.
Also, any action that I explicitly didn’t set in a given layer, I marked it as “None”. This was done because, by default, the Oryx configurator marks other keys in the layer “transparent” to let the key fall through to the Base layer. I do this in all layers except the Base layer (that layer is full anyway, so it doesn’t matter). This was done because I didn’t want to encounter any behavior that I didn’t explicitly program. The TT() keys are not set to “None” because they still have a function; pressing one of those keys again will take you into the Adjust layer or will take you back to the Base layer, depending on which layer you’re in.
The last “big thing” to note here (because it’s common in other layers too) is that at this point, I’ve designated the ESC key as my “escape hatch” in all layers that could be considered “not transient”. This key is mapped to TO(1) everywhere that is relevant, which brings you back to the Base layer. There are other keys in other layers that do this, but the ESC key is supposed to be my “safe key” that gets me out of anywhere I might lose myself in. Pressing ESC many times is also fine in pretty much all situations, since even if I get into the Base layer, it’s just mapped to actual ESC, which doesn’t really ever do anything destructive.
Other things to note here:
- I removed all function keys, since I basically never use them.
- I removed various other keys like
PgUp/PgDownbecause I don’t really find them to be all that useful (I have other shortcuts that accomplish the same thing) and I don’t think that I’d use the Non-US characters. - I brought back
EnterandBackspacebecause they “made sense” to keep (I was gaining nothing by having them removed like it is in the default configuration). - I persisted the same modifier keys from the
Baselayer into both layers because I have a lot of application-specific shortcuts that rely on using these modifiers in conjunction with characters/symbols that are in these layers.
The rest of the layout should be fairly obvious, so I’m not going to enumerate all of the mapping. 3 layers down, 9 to go.
The Adjust Layer
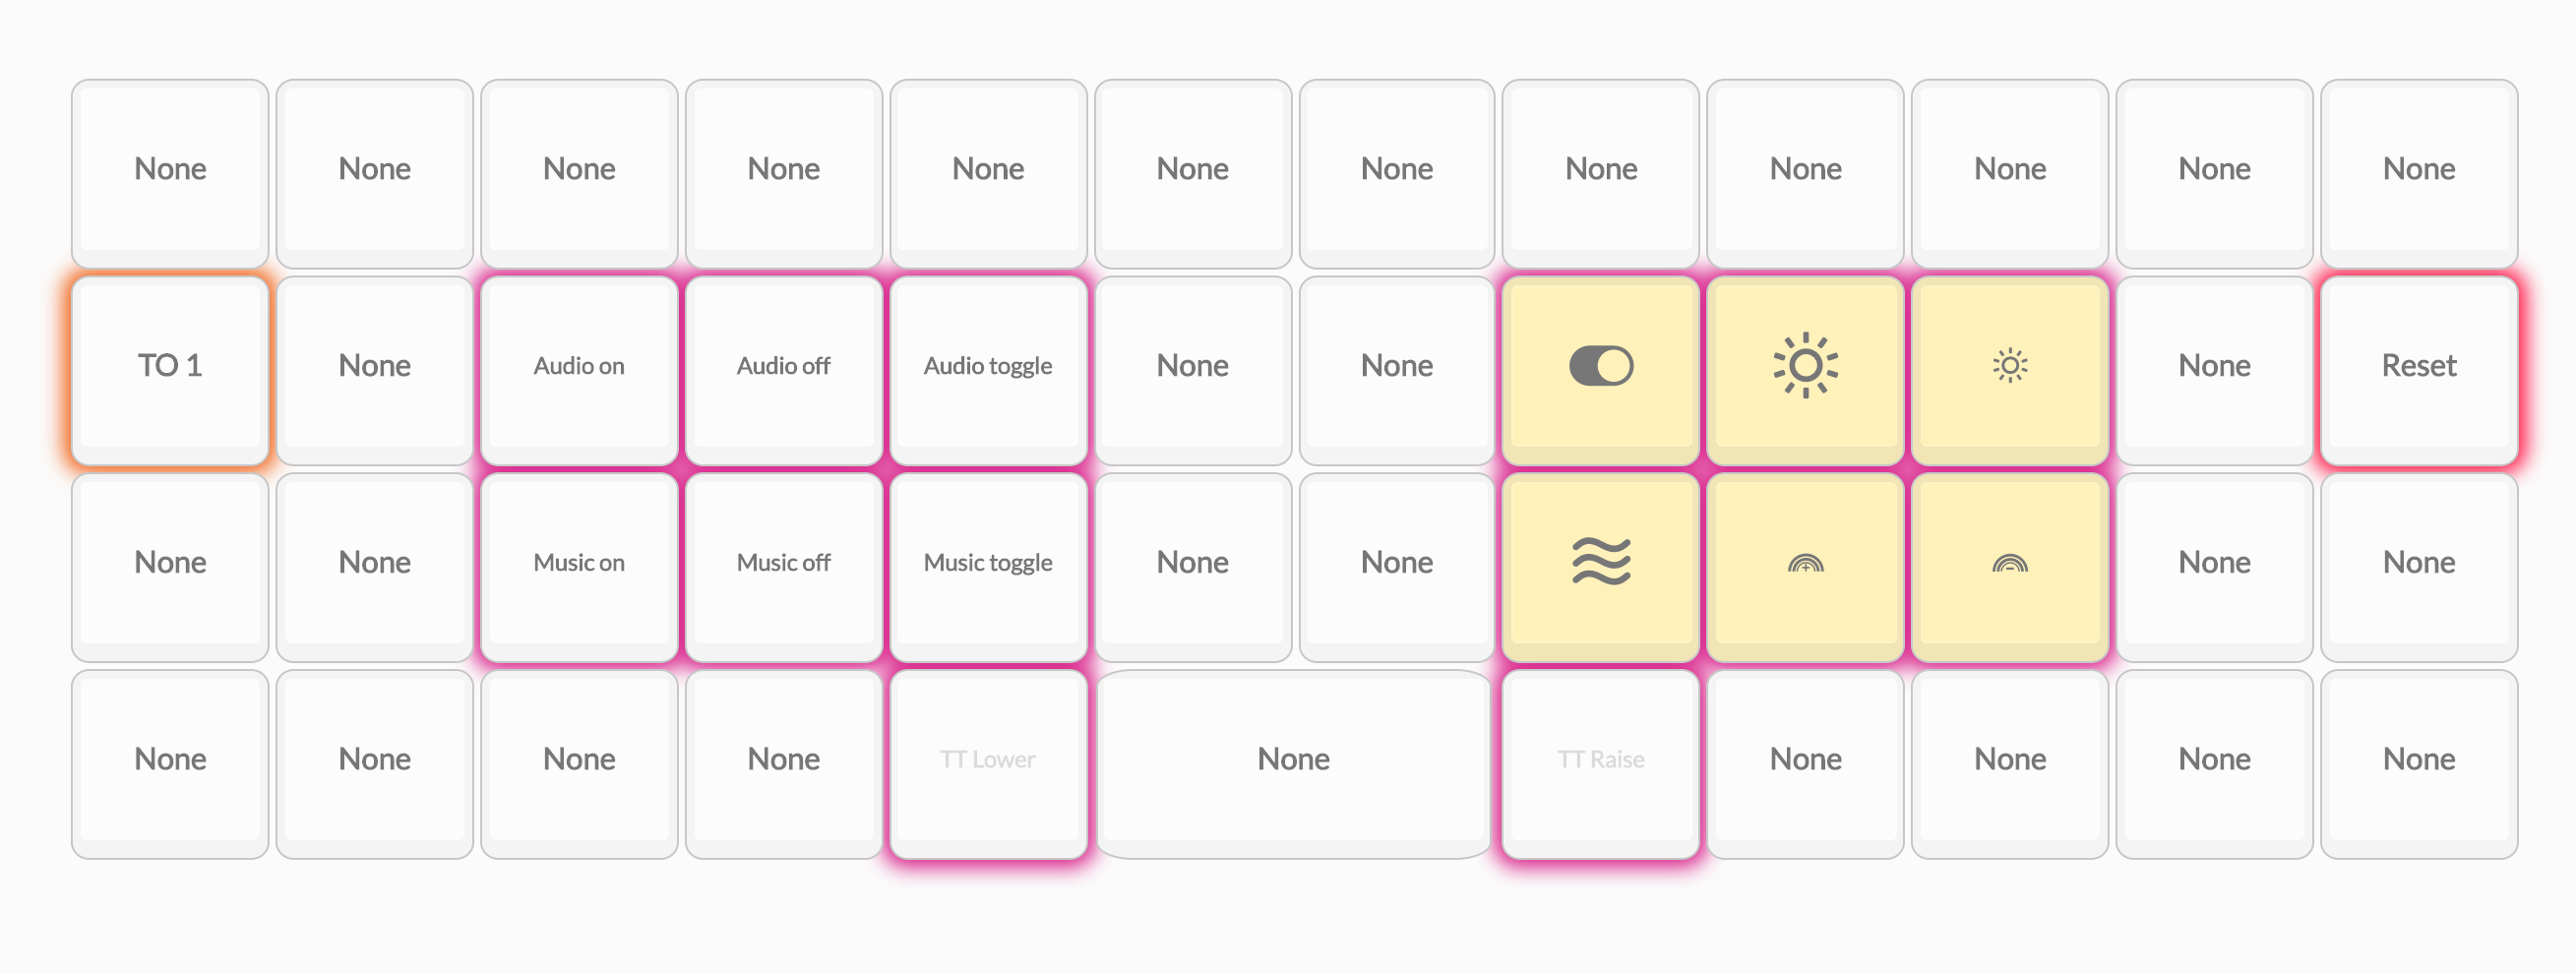
I have the least to say about this layer. Note that we have the same “escape hatch”, but all other keys remain the same as the default configuration. If you have any ideas as to what else I should put here, please let me know!
The NORMAL Layer
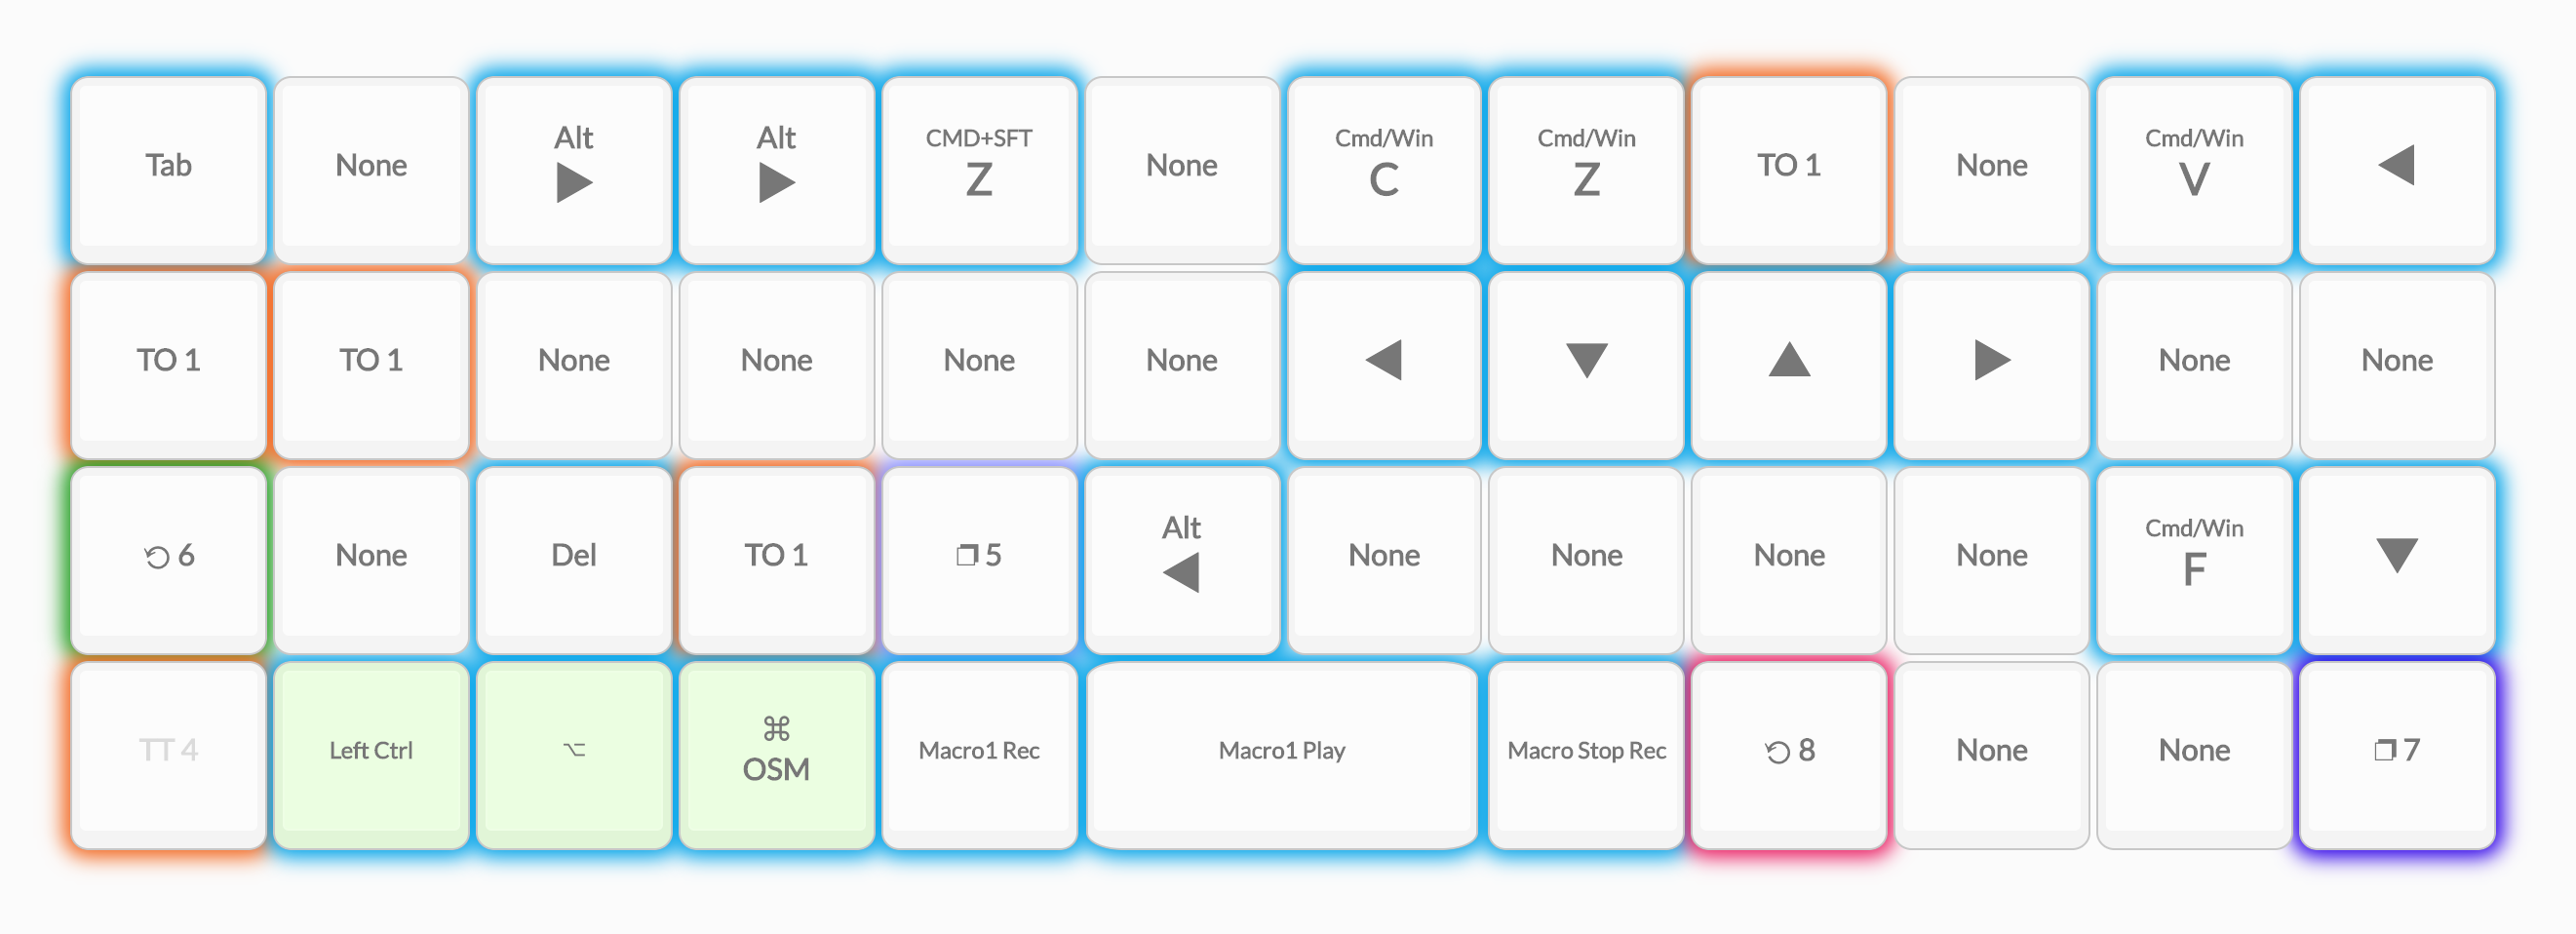
You get to the NORMAL layer by tapping the QMK key at the bottom-left of the Base layer. This is where things get a bit more interesting, and where Vim’s influence started getting the best of me.
This layer is called NORMAL because, if you’re in a text field that isn’t Vim (which happens more often than I would like), this layer gives some basic Vim motions that allow you to navigate text easily using shortcuts that are native to the OS.
An important thing to call out is that, although it’s called NORMAL, this isn’t meant to be the layer that you’re always in (which is common when you’re in an actual Vim buffer). I had considered making this the Base layer, but then it got in the way when editing in “real” Vim. So, even though in a conceptual sense I try to consider the Base layer analogous to INSERT mode, they’re still two very distinct concepts that shouldn’t be intermingled. If I’m in an actual Vim buffer, I ignore these layers altogether and always return to Base, since the other layers wouldn’t make a lot of sense to use in place of honest-to-goodness Vim keybindings.
Here is the key mapping for the NORMAL layer as it stands now (anything not listed can be assumed to be “None”):
| Physical Key | Mapping | Action Performed | Color |
|---|---|---|---|
| Tab | tab | Tab | #00a3e9 Desert Sun Blue |
| W | alt+right | Move right 1 word | #00a3e9 Desert Sun Blue |
| E | alt+right | Move right 1 word | #00a3e9 Desert Sun Blue |
| R | cmd+shift+z | Redo | #00a3e9 Desert Sun Blue |
| Y | cmd+c | Copy | #00a3e9 Desert Sun Blue |
| U | cmd+z | Undo | #00a3e9 Desert Sun Blue |
| I | TO(1) | Go to Base | #f2671f Sunset Orange |
| P | cmd+v | Paste | #00a3e9 Desert Sun Blue |
| Backspace | left | Move left 1 character | #00a3e9 Desert Sun Blue |
| ESC | TO(1) | Go to Base | #f2671f Sunset Orange |
| A | TO(1) | Go to Base | #f2671f Sunset Orange |
| H | left | Move left 1 character | #00a3e9 Desert Sun Blue |
| J | down | Move down 1 character | #00a3e9 Desert Sun Blue |
| K | up | Move up 1 character | #00a3e9 Desert Sun Blue |
| L | right | Move right 1 character | #00a3e9 Desert Sun Blue |
| Shift | MO(6) | Momentarily go to NRMLSHIFT | #219e20 Material Green |
| X | del | Delete 1 character | #00a3e9 Desert Sun Blue |
| C | TO(1) | Go to Base | #f2671f Sunset Orange |
| V | TG(5) | Toggle VISUAL | #878eff Solarized Purple |
| B | alt+left | Move left 1 word | #00a3e9 Desert Sun Blue |
/? | cmd+f | Search (most apps use this) | #00a3e9 Desert Sun Blue |
| Enter | down | Move down 1 line | #00a3e9 Desert Sun Blue |
| QMK | TRNS | Go back to Base | #f2671f Sunset Orange |
| CTRL | ctrl | Left Control key | #00a3e9 Desert Sun Blue |
| ALT | alt | Left Alt key | #00a3e9 Desert Sun Blue |
| OS | OSM(MOD_LGUI) | One-shot CMD Modifier | #00a3e9 Desert Sun Blue |
| Lower | Macro 1 Rec | Start recording a macro | #00a3e9 Desert Sun Blue |
| Space | Macro 1 Play | Play macro 1 that was recorded | #00a3e9 Desert Sun Blue |
| Raise | Macro Stop Rec | Stop recording the macro | #00a3e9 Desert Sun Blue |
| Left | MO(8) | Momentarily go to LGUI_ALL | #ea1e63 Material Red |
| Right | TG(7) | Toggle WINDOWZ | #2e00e9 Sunset Blue/Purple |
Scroll down to the “Special Mention: RGB Handling” section to understand what the colors mean.
The VISUAL Layer
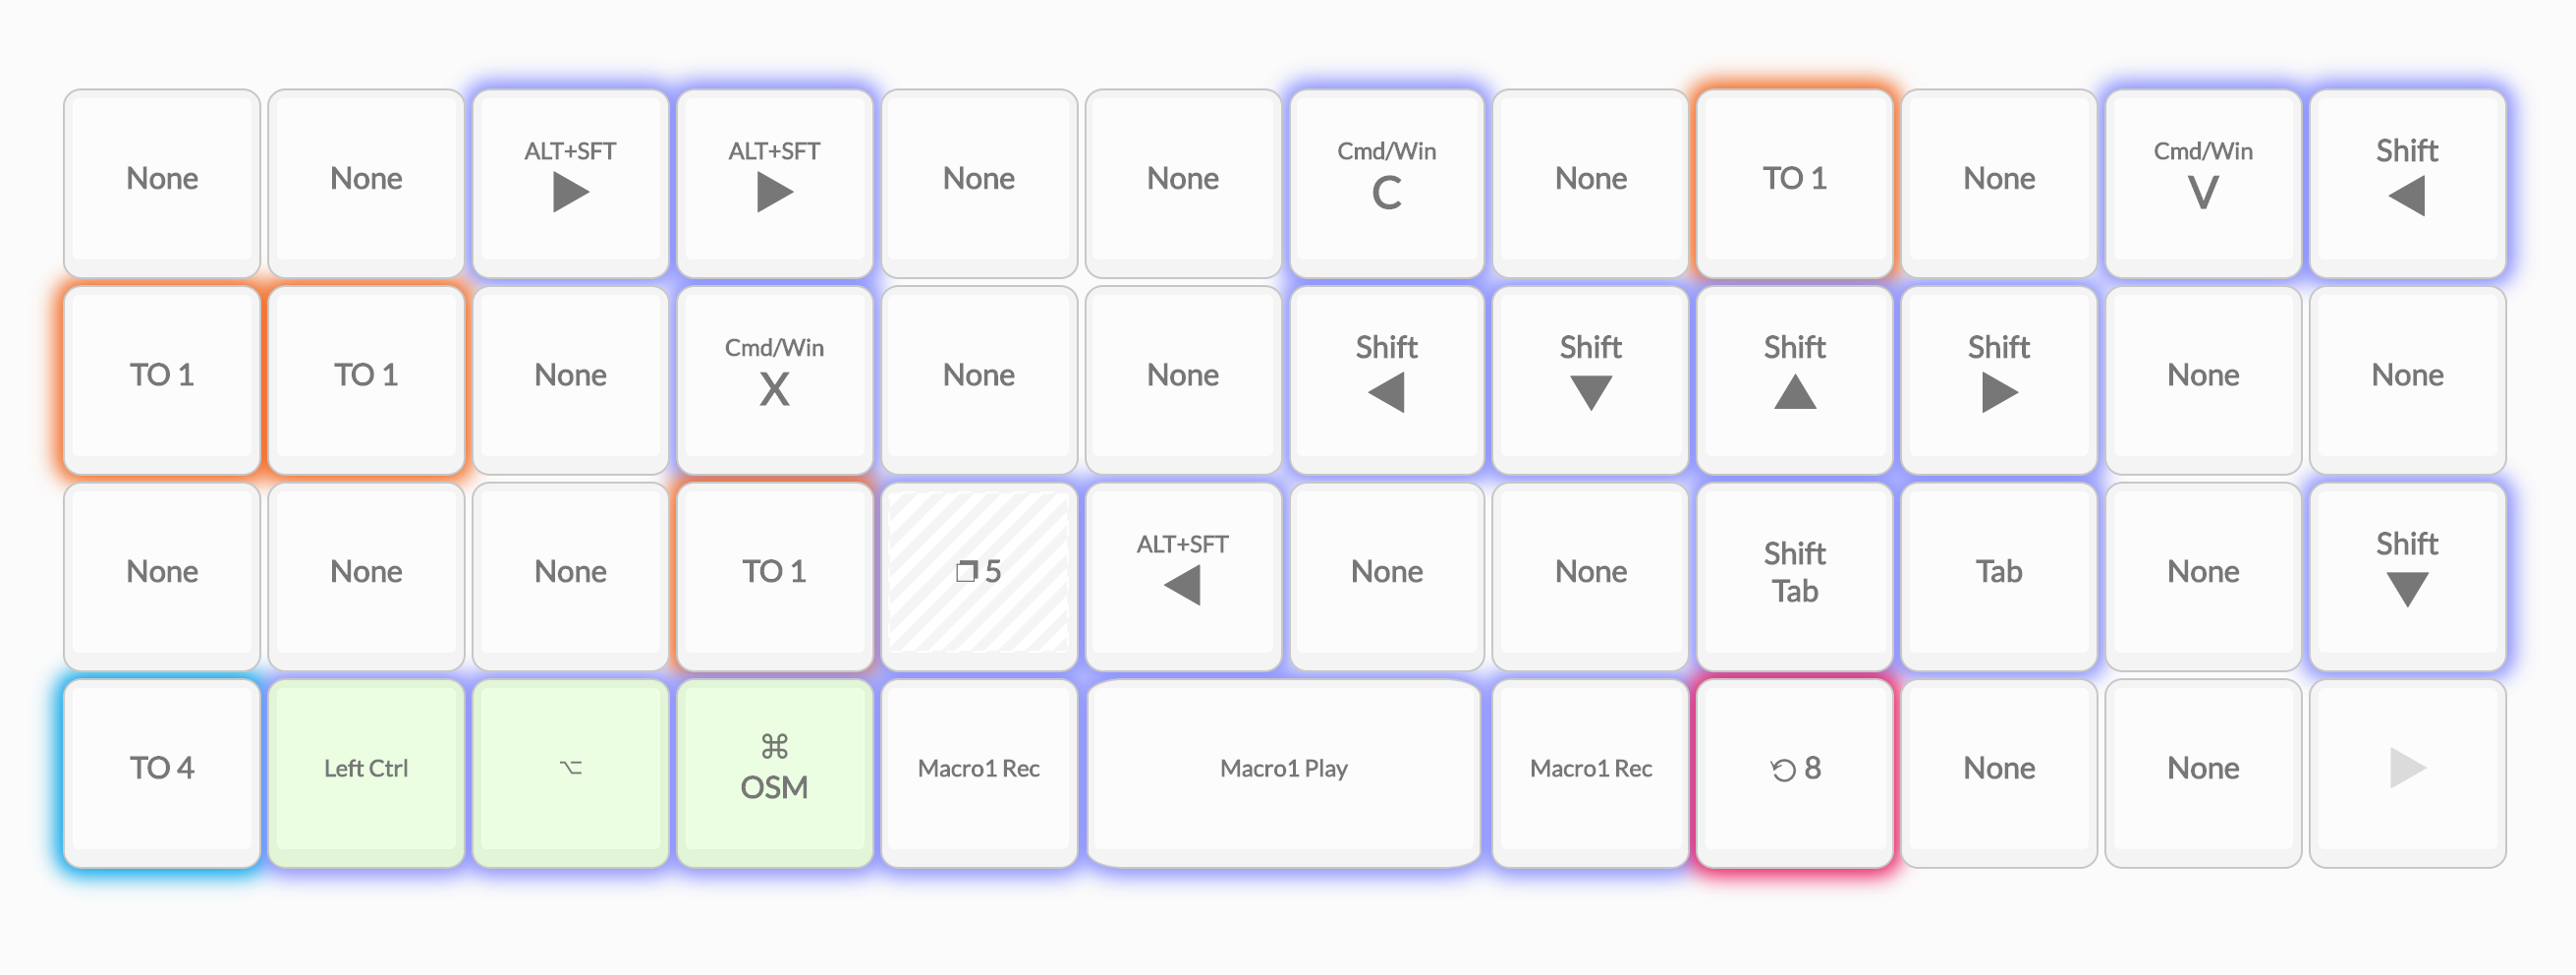
The VISUAL layer is meant to be the layer that performs selection-based actions, similar to how VISUAL mode works in Vim. You get to it from the NORMAL layer by tapping V. The main draw of this layer is that you can perform large selections relatively quickly; it basically takes all of the text navigation shortcuts from the NORMAL layer and adds “Shift” to them.
Here is the keymapping for this layer.:
| Physical Key | Mapping | Action Performed | Color |
|---|---|---|---|
| W | alt+shift+right | Select right 1 word | #878eff Solarized Purple |
| E | alt+shift+right | Select right 1 word | #878eff Solarized Purple |
| Y | cmd+c | Copy | #878eff Solarized Purple |
| I | TO(1) | Go to Base | #878eff Solarized Purple |
| P | cmd+v | Paste | #878eff Solarized Purple |
| Backspace | shift+left | Select left 1 character | #878eff Solarized Purple |
| ESC | TO(1) | Go to Base | #878eff Solarized Purple |
| A | TO(1) | Go to Base | #878eff Solarized Purple |
| D | cmd+x | Cut | #878eff Solarized Purple |
| H | shift+left | Select left 1 character | #878eff Solarized Purple |
| J | shift+down | Select down 1 line | #878eff Solarized Purple |
| K | shift+up | Select up 1 line | #878eff Solarized Purple |
| L | shift+right | Select right 1 character | #878eff Solarized Purple |
| C | TO(1) | Go to Base | #878eff Solarized Purple |
| V | TRNS | Go back to NORMAL | #00a3e9 Desert Sun Blue |
| B | alt+shift+left | Select left 1 word | #878eff Solarized Purple |
| <, | shift+tab | Unindent (depends on app) | #878eff Solarized Purple |
| >. | tab | Indent (depends on app) | #878eff Solarized Purple |
| Enter | shift+down | Select down 1 line | #878eff Solarized Purple |
| QMK | TO(4) | Go to NORMAL | #00a3e9 Desert Sun Blue |
| CTRL | ctrl | Left Control key | #878eff Solarized Purple |
| ALT | alt | Left Alt key | #878eff Solarized Purple |
| OS | OSM(MOD_LGUI) | One-shot cmd modifier | #878eff Solarized Purple |
| Lower | Macro 1 Rec | Start recording a macro | #878eff Solarized Purple |
| Space | Macro 1 Play | Play macro 1 that was recorded | #878eff Solarized Purple |
| Raise | Macro Stop Rec | Stop recording the macro | #878eff Solarized Purple |
| Left | MO(8) | Momentarily go to LGUI_ALL | #ea1e63 Material Red |
Not much else going on here, so onto the next layer.
The NRMLSHIFT Layer
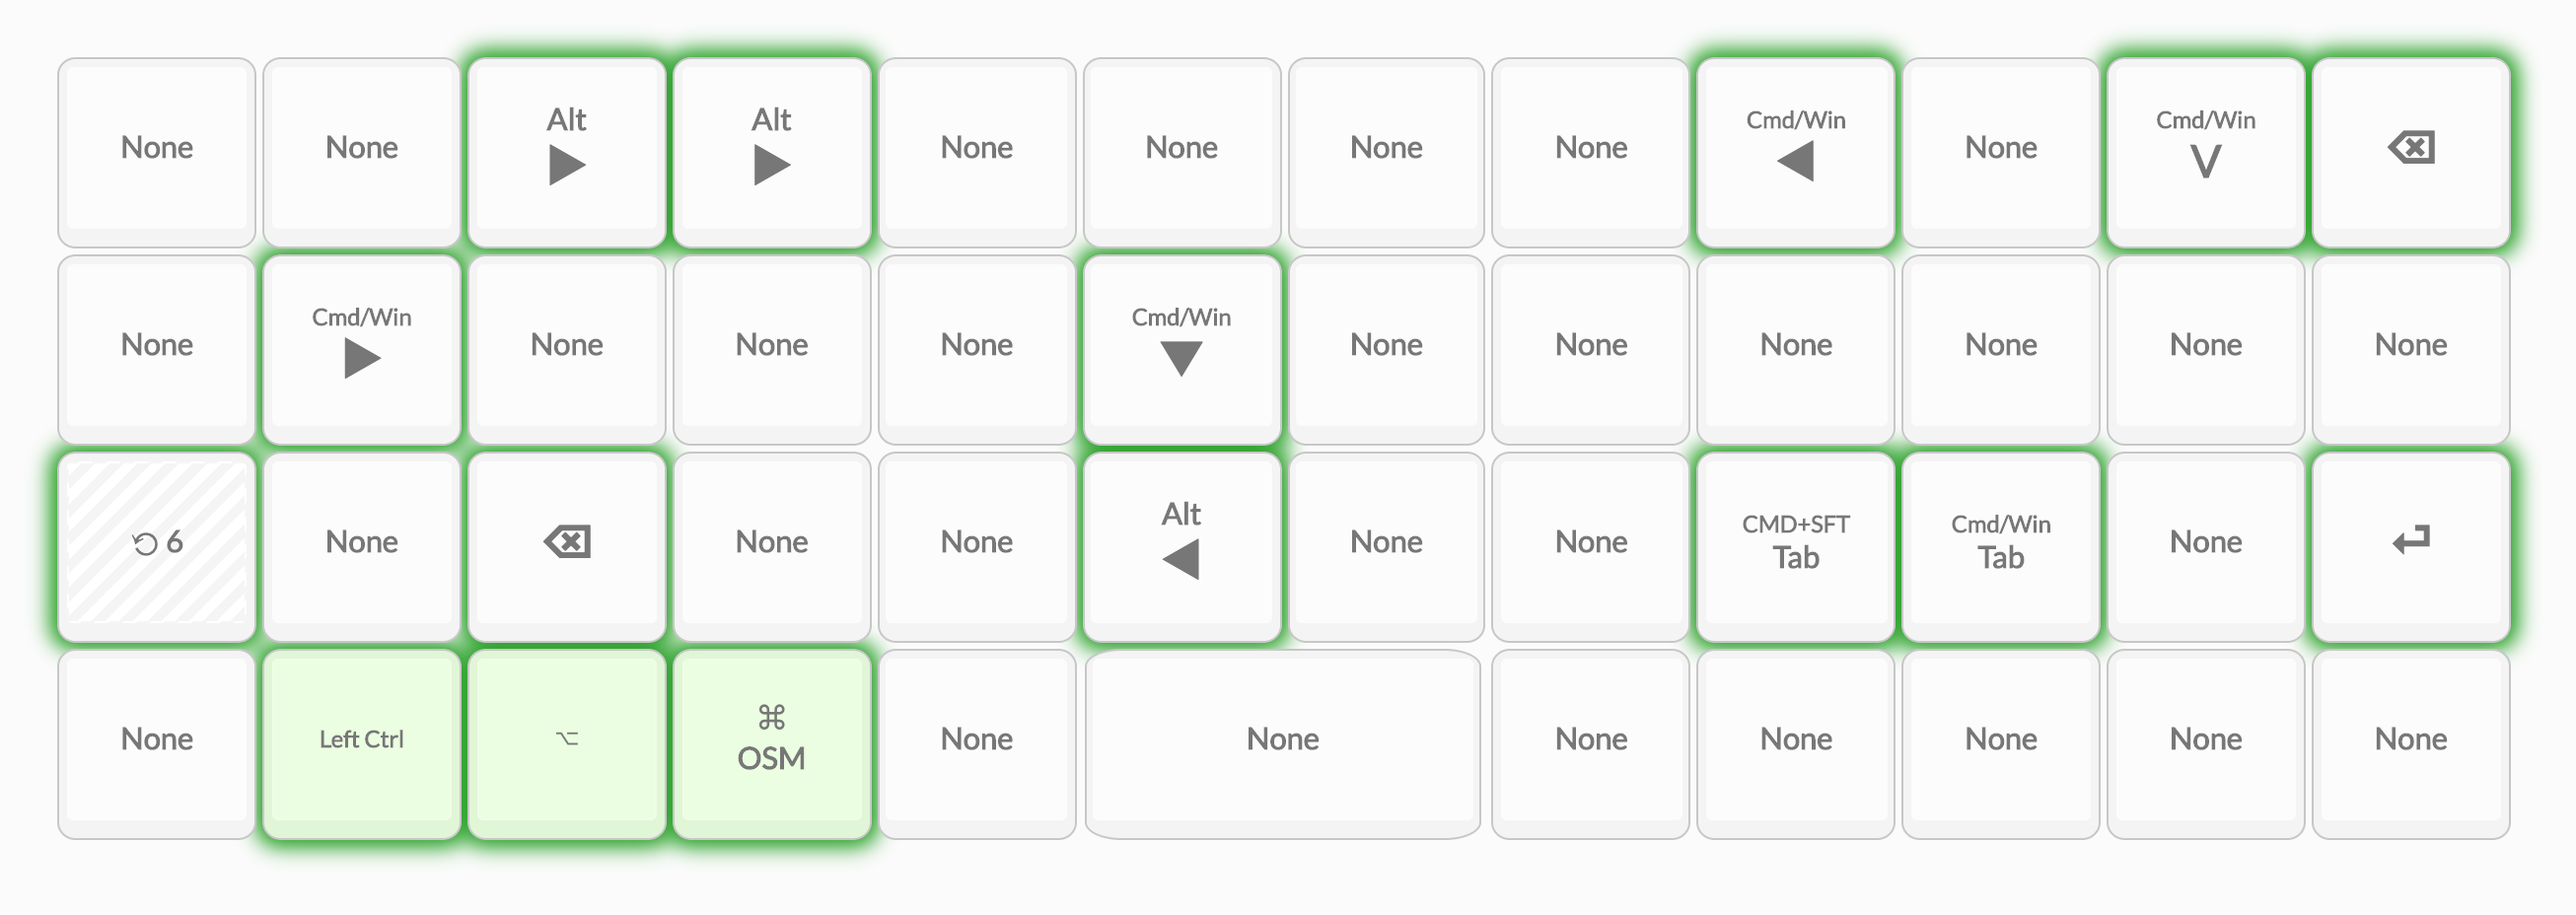
The NRMLSHFT layer is only accessible from the NORMAL layer and, as the name implies, it contains actions that are analogous to “shifted” keys in Vim’s NORMAL mode (like X or G). I didn’t do a whole lot of customization here, and there are probably some actions that I’ve missed; I’ll slowly add more as I discover them.
Here is the keymapping for this layer.:
| Physical Key | Mapping | Action Performed | Color |
|---|---|---|---|
| W | alt+right | Move right 1 word | #219e20 Material Green |
| E | alt+right | Move right 1 word | #219e20 Material Green |
| I | cmd+left | Move to beginning of line | #219e20 Material Green |
| P | cmd+v | Copy | #219e20 Material Green |
| Backspace | backspace | Backspace 1 character | #219e20 Material Green |
| A | cmd+right | Move to end of line | #219e20 Material Green |
| G | cmd+down | Move to bottom | #219e20 Material Green |
| Shift | MO(6) | Momentarily activate NRMLSHFT | #219e20 Material Green |
| X | backspace | Backspace 1 character | #219e20 Material Green |
| B | alt+left | Move left 1 word | #219e20 Material Green |
| <, | cmd+shift+tab | Unindent (depends on app) | #219e20 Material Green |
| >. | cmd+tab | Indent (depends on app) | #219e20 Material Green |
| Enter | enter | Insert newline | #219e20 Material Green |
| CTRL | ctrl | Left Control key | #219e20 Material Green |
| ALT | alt | Left Alt key | #219e20 Material Green |
| OS | OSM(MOD_LGUI) | One-shot cmd modifier | #219e20 Material Green |
The WINDOWZ Layer
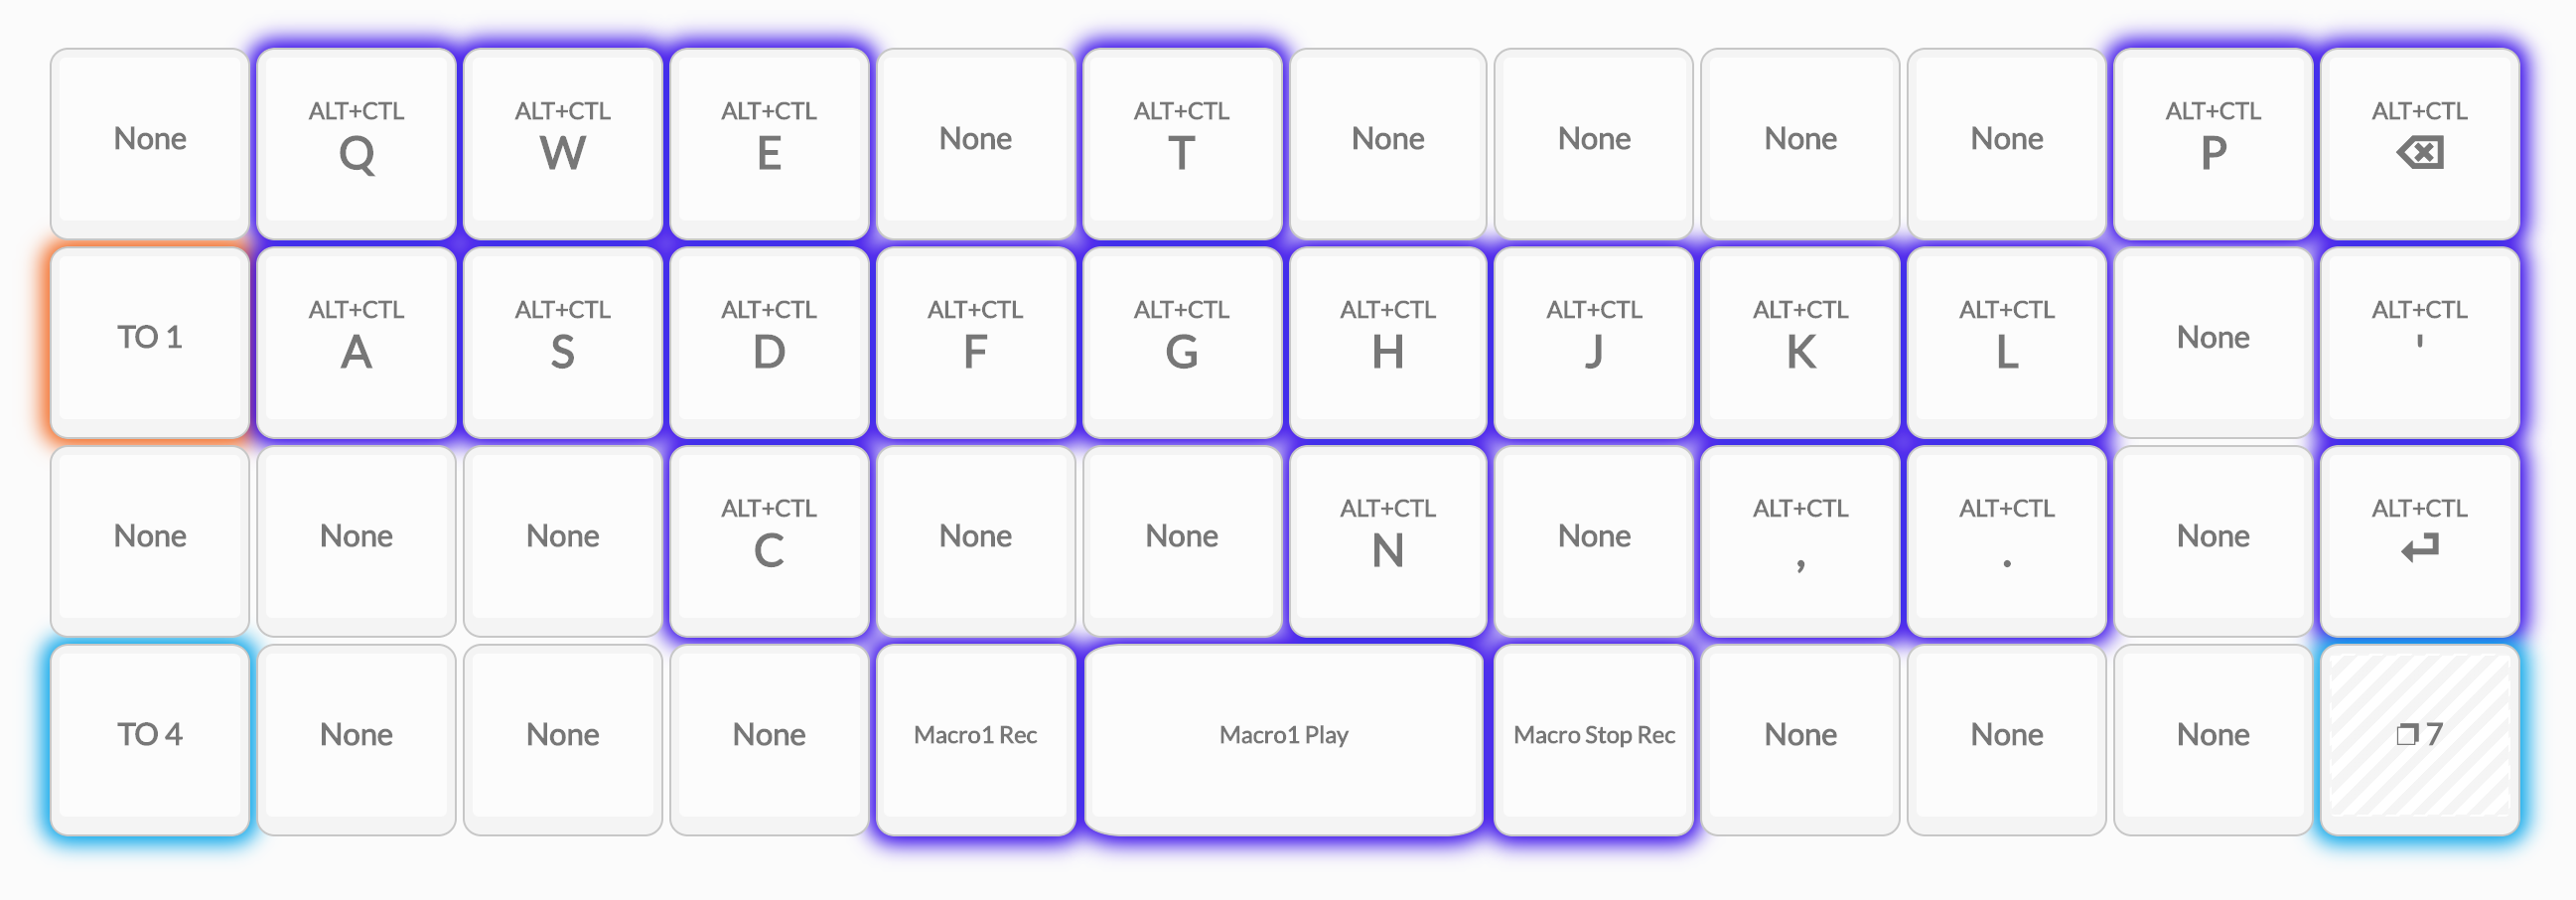
This layer doesn’t make much sense to the casual onlooker, mostly because it is used exclusively for my window management tool on macOS: Rectangle. I tile/move/resize my windows on macOS all day thanks to this tool. It’s invaluable enough for me that I’ve dedicated an entire layer to it. The above keymap makes more sense when you see how the keyboard shortcuts for that application are set up on my machine:
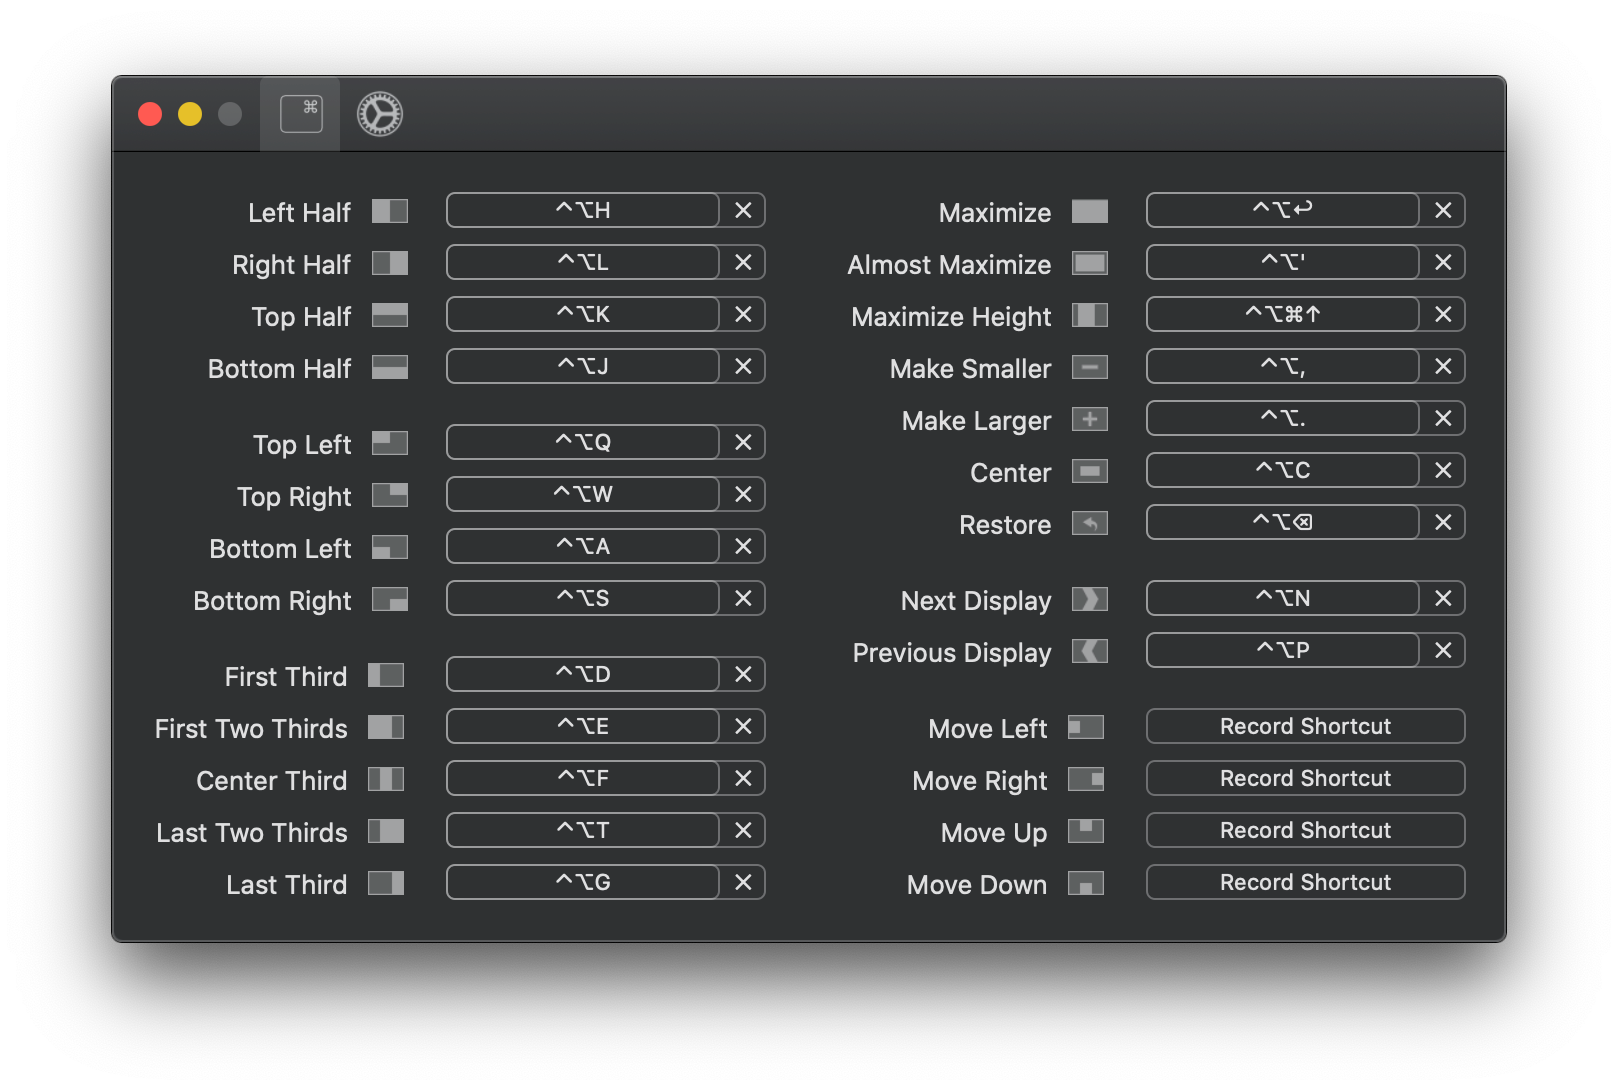
That’s all there is to the WINDOWZ layer! Here’s the keymapping:
| Physical Key | Mapping | Action Performed | Color |
|---|---|---|---|
| Q | alt+ctrl+q | Move window top left | #2e00e9 Sunset Blue/Purple |
| W | alt+ctrl+w | Move window top right | #2e00e9 Sunset Blue/Purple |
| E | alt+ctrl+e | Move window first two thirds | #2e00e9 Sunset Blue/Purple |
| T | alt+ctrl+t | Move window last two thirds | #2e00e9 Sunset Blue/Purple |
| P | alt+ctrl+p | Move window to previous display | #2e00e9 Sunset Blue/Purple |
| Backspace | alt+ctrl+backspace | Restore original window size/pos | #2e00e9 Sunset Blue/Purple |
| ESC | TO(1) | Go to Base | #878eff Solarized Purple |
| A | alt+ctrl+a | Move window bottom left | #2e00e9 Sunset Blue/Purple |
| S | alt+ctrl+s | Move window bottom right | #2e00e9 Sunset Blue/Purple |
| D | alt+ctrl+d | Move window first third | #2e00e9 Sunset Blue/Purple |
| F | alt+ctrl+f | Move window center third | #2e00e9 Sunset Blue/Purple |
| G | alt+ctrl+g | Move window last third | #2e00e9 Sunset Blue/Purple |
| H | alt+ctrl+h | Move window left half | #2e00e9 Sunset Blue/Purple |
| J | alt+ctrl+j | Move window bottom half | #2e00e9 Sunset Blue/Purple |
| K | alt+ctrl+k | Move window top half | #2e00e9 Sunset Blue/Purple |
| L | alt+ctrl+l | Move window right half | #2e00e9 Sunset Blue/Purple |
| ’ | alt+ctrl+’ | ‘Almost maximize’ window | #2e00e9 Sunset Blue/Purple |
| C | alt+ctrl+c | Center current window | #2e00e9 Sunset Blue/Purple |
| N | alt+ctrl+n | Move window to next display | #2e00e9 Sunset Blue/Purple |
| , | alt+ctrl+, | Make window smaller | #2e00e9 Sunset Blue/Purple |
| . | alt+ctrl+. | Make window bigger | #2e00e9 Sunset Blue/Purple |
| Enter | alt+ctrl+enter | Maximize window | #2e00e9 Sunset Blue/Purple |
| QMK | TO(4) | Go to NORMAL | #00a3e9 Desert Sun Blue |
| Lower | Macro 1 Rec | Start recording a macro | #2e00e9 Sunset Blue/Purple |
| Space | Macro 1 Play | Play macro 1 that was recorded | #2e00e9 Sunset Blue/Purple |
| Raise | Macro Stop Rec | Stop recording the macro | #2e00e9 Sunset Blue/Purple |
| Right | - | Go back to NORMAL | #00a3e9 Desert Sun Blue |
The LGUI_ALL Layer
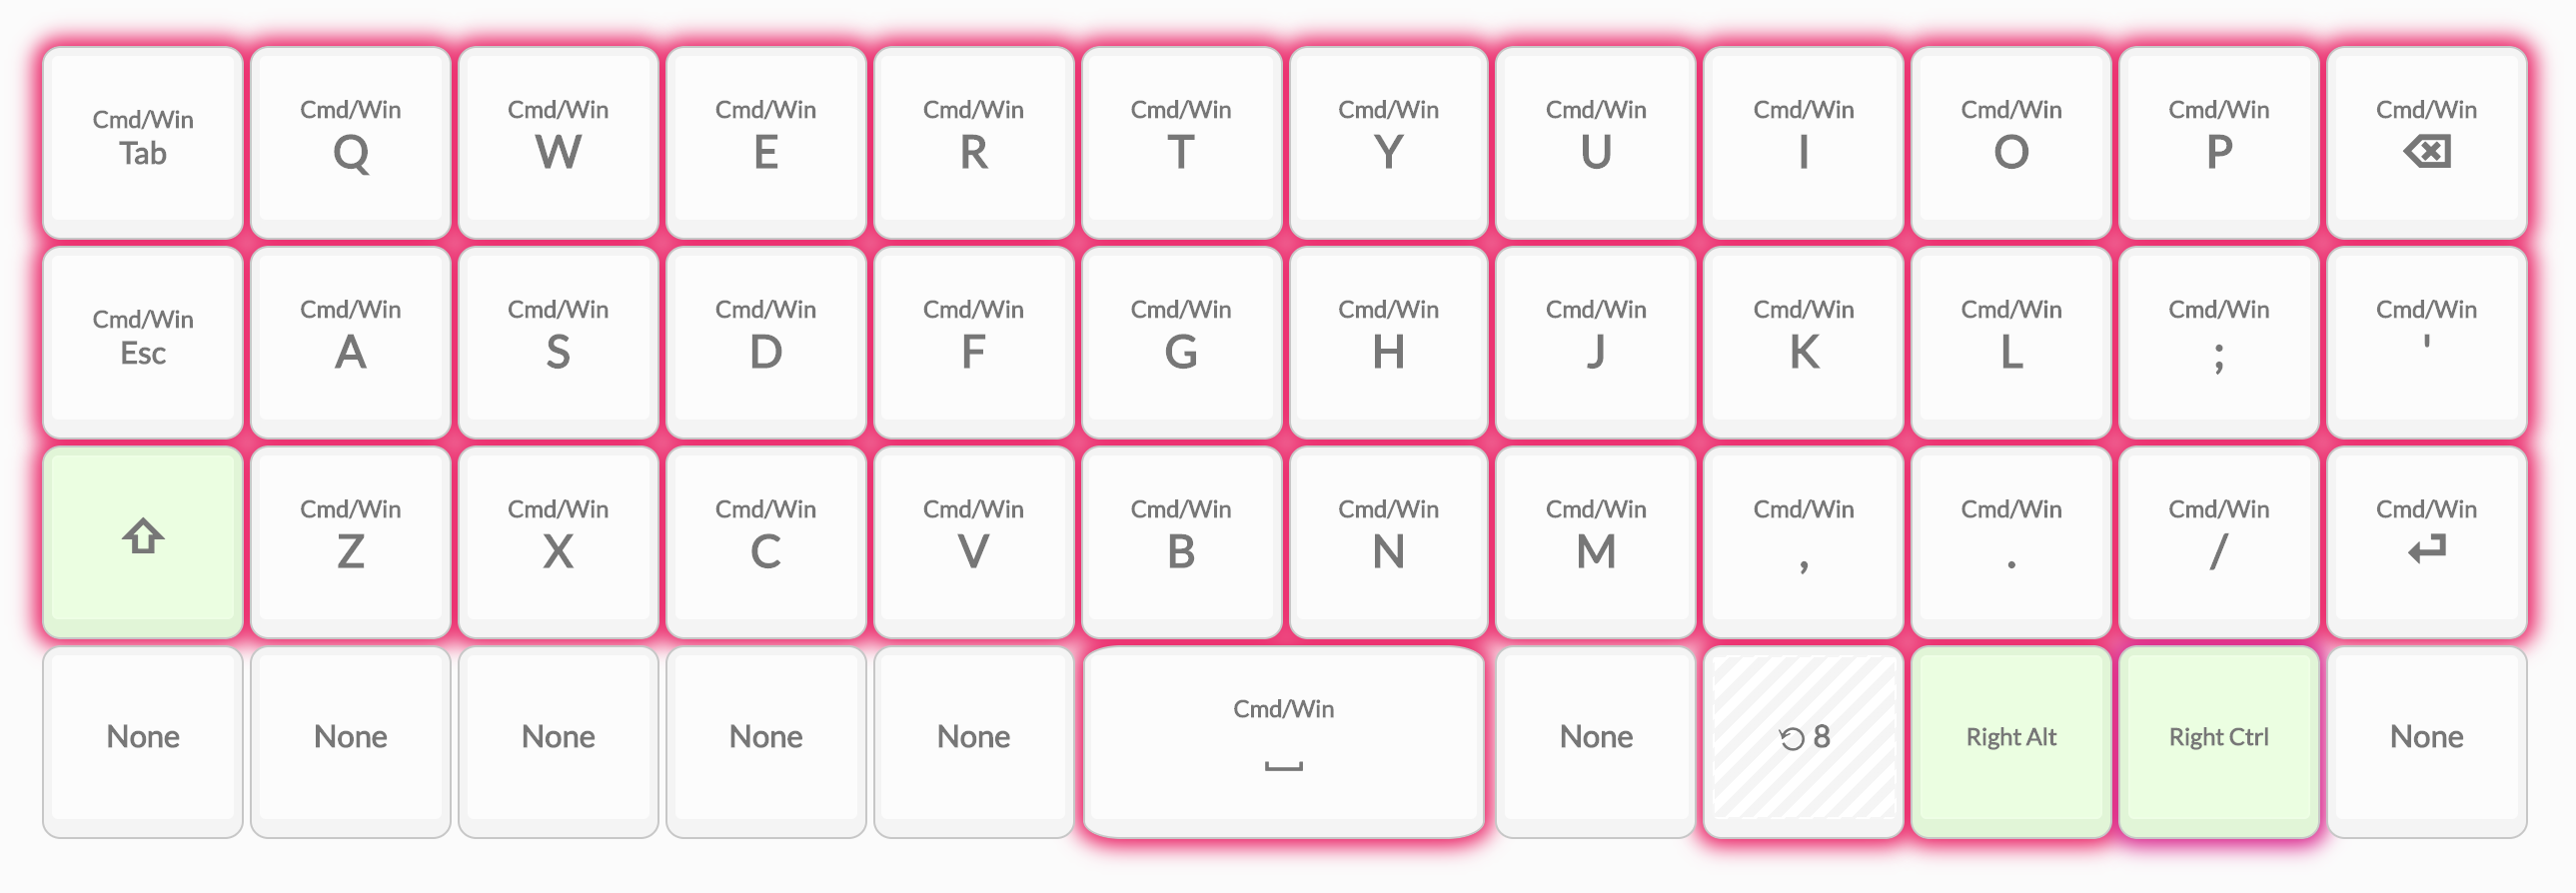
This layer is an example of pure laziness on my part. The only reason why LGUI_ALL exists is because, when I was in the NORMAL or VISUAL layers, I occasionally found myself wanting to perform some kind of modifier + “regular” key combination (almost always cmd + something), but then stay on the current layer. This is an incredibly brute-forced approach to handling that need, and is definitely something that I’ll come back and revisit in the near future. For now, it works fine, so I’m not really worried. If you have any suggestions for an approach to this, I’m all ears!
I didn’t create a keymap gist for this because it’s simply a layer that has cmd prepended to all the keys on the keyboard (i.e. cmd+q, cmd+w, etc.).
Special Mention: RGB Handling
Each layer has what you’d call a “dominant” color that signifies what layer you’re in. If you were to tap/hold/whatever a key that is illuminated with the color that is dominant for that layer, you are guaranteed to not be kicked out of that layer.
The same logic applies if there is a key with a color that is “not” dominant for the layer you’re on; if you tap a key that is not dominant, you should be taken to a layer where the color of the key you pressed is dominant.
The only layers where there are no other colors that signify other layers are NRMLSHIFT and LGUI_ALL; this is because the only way to get into those layers is by holding an MO() key, and once you release that key you’re back on the layer that you started with. No need for an “escape hatch” in those layers.
Here are the colors that I used for this layout (colors are taken from the per-key color options in the Oryx configurator):
| Layer | Color |
|---|---|
Lower 0 | #ecb392 Raspberry Light Brown |
Base 1 | #f2671f Sunset Orange |
Raise 2 | #219e20 Material Green |
Adjust 3 | #d91f89 Sunset Pink |
NORMAL 4 | #00a3e9 Desert Sun Blue |
VISUAL 5 | #878eff Solarized Purple |
NRMLSHFT 6 | #219e20 Material Green |
WINDOWZ 7 | #2e00e9 Sunset Blue/Purple |
LGUI_ALL 8 | #ea1e63 Material Red |
NRMLSHIFT and Raise having the same color as the dominant color is an accident that I’m too lazy to fix. They’ll never be accessible from the same layer, so I think that it’s fine.
Feedback (if anyone is listening)
After going through all of this, I’ve got some feedback.
- The Wally GUI application was a tad more unreliable than I would’ve liked. Sometimes I would go to flash the board, the app would hang, and then every keyboard I used wouldn’t work until I rebooted. The
wally-cliCLI tool was rock solid, though, and I’ve been using that for all of my flashing. Your mileage may vary. - Especially when I was in the midst of changing colors, I found it basically impossible to tell what color was already used from the per-key palettes when you selected a key. It’d be great if, when you selected a key in the UI, it’d also tell you what color you’ve assigned to that key.
- The
OSL()layer action can bring you to a layer, but it disables the key in that layer. This makes sense for layer actions likeMO(), because the layer is only active when you are actively holding the key that got you there. However, for layer functions likeOSL(), it’s perfectly fine to lift your finger off the key that got you into that layer, freeing that key up for other actions. This made things like aggmotion in theNORMALlayer (which I would’ve mapped tocmd+up) much more clumsy to implement with the UI, so I didn’t bother.
What’s next?
There are already multiple things that I want to improve upon for this layout.
- Add some more actions into the
Adjustlayer; I basically ignored it heavily because I couldn’t think of anything, so this is ripe for improvement. - Come up with some more common Vim motions that I can accomplish without getting into macros; at a certain point, getting into macros will be inevitable, but using the GUI tool is so much easier than editing the keymap code (IMO) that I’m going to dread when I have to switch over.
- Once I exhaust all available options to me in the UI, I want to start messing around with creating more complex macros. There were a few chords/motions that I created that definitely could have been more cleanly defined via macros, and that’s probably the next thing that I’d get around to messing with.
- I want to investigate using leader keys with QMK. Especially coming from Spacemacs, this capability made me salivate; but I knew that it would be an unending hole of complexity and opportunities that I just avoided it altogether. Maybe the next time I have 5 solid days of playing around, I’ll do it, but right now… nope.
Anyway, that about wraps this up. For those of you that made it to the end, you get a virtual pat on the back, and permission to go and have a cookie!